ACNH Island Planning: Build a Clear Plan Before You Terraform
ACNH island planning works best when you separate the creative dream from the construction order. This guide shows how to turn a blank map, a messy island, or a saved planner screenshot into zones, routes, building moves, bridges, inclines, and a build sequence you can actually follow in Animal Crossing: New Horizons.
Quick Answer: What Should You Plan First?
Start ACNH island planning with the parts you cannot freely move: airport, Resident Services, river mouths, pier, secret beach, beach rocks, and existing cliff or river shapes. Once those anchors are marked, plan one main route from the airport to Resident Services and then branch toward homes, shops, museum, campsite, beaches, and scenic areas.
Do not begin with furniture or tiny decoration. Those choices are fun, but they hide the bigger questions: can visitors understand the route, can you reach daily services quickly, do bridges and inclines solve real movement problems, and can the layout be built without moving the same house three times?
- Map fixed landmarks before choosing a theme.
- Block the island into 4-6 useful zones.
- Plan the airport route and daily errand loop before decoration.
- Place buildings with walking space, not just visual symmetry.
- Save a simple fallback plan before starting heavy terraforming.
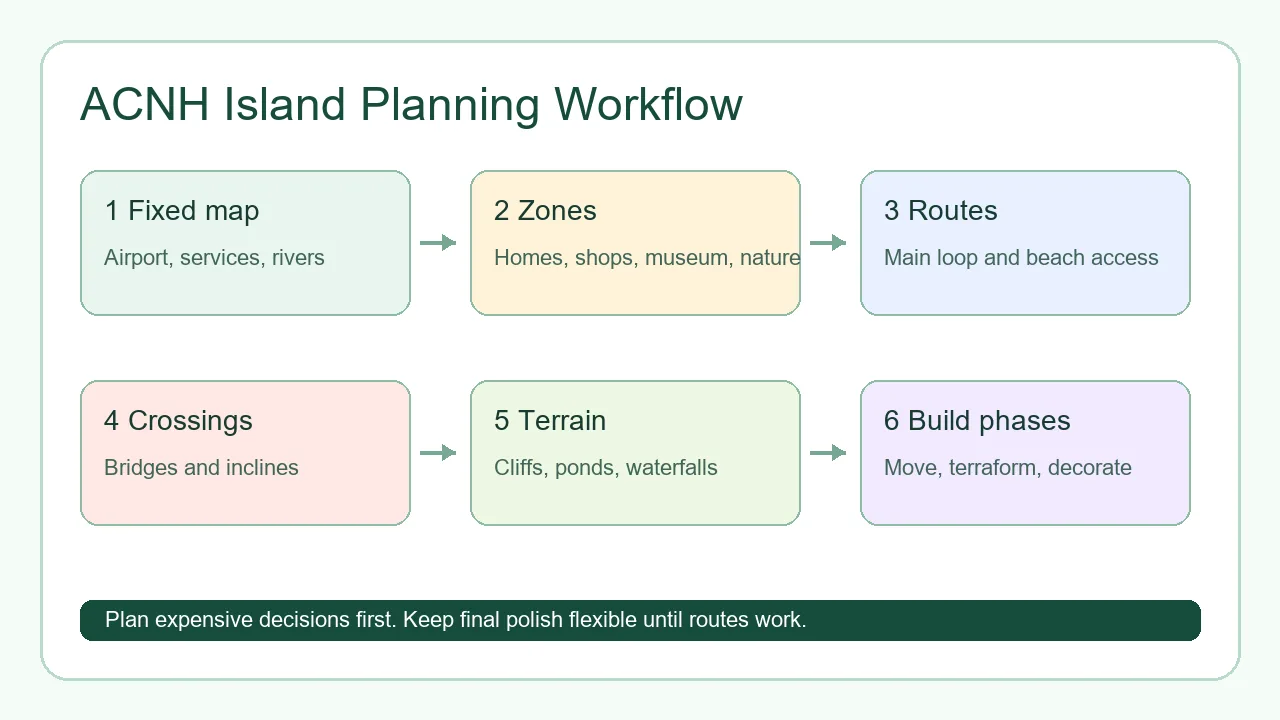
A Step-by-Step ACNH Island Planning Workflow
Most players get stuck because they try to solve theme, layout, terraforming, and decoration at the same time. A better workflow is to move from permanent constraints to flexible details. Each stage below should produce a visible decision in your planner or map notes.
If you already have a partial island, trace what exists first. Mark what you love, what blocks movement, and what you are willing to move. A redesign plan should preserve useful work instead of treating every problem as a reason to flatten the island.
- Trace the fixed map. Draw airport, Resident Services, river mouths, pier, rocks, beach exits, secret beach, current cliffs, and current rivers before adding ideas.
- Choose the island job. Decide whether the island should feel like a daily-use town, natural forest, resort, farm, city, showcase entrance, or mixed seasonal map.
- Block zones at rough size. Use large shapes for homes, shops, museum, campsite, nature, farms, beaches, viewpoints, and empty future space.
- Draw one primary route. Connect airport, Resident Services, shops, museum, homes, and beaches with a path loop that works before decoration.
- Place buildings and crossings. Test houses, shops, museum, bridge spots, and incline spots together so movement and building scale agree.
- Plan terrain last. Only reshape cliffs, rivers, ponds, and waterfalls after you know which zones and routes need them.
- Break the build into phases. Build one zone at a time: routes first, buildings second, terrain third, decoration fourth, polish last.
7 Planning Decisions That Prevent Rework
Use these planning decisions as checkpoints. They turn acnh island planning from a vague mood board into a buildable island plan.
Airport-to-Resident-Services Route
This is the first route visitors see and the route you use constantly. A clear path makes the whole island feel intentional.
- Best for
- Every island, especially maps where Resident Services is very close to the airport.
- Planner setup
- Draw the shortest direct route and one scenic route. Compare which one leaves better room for shops, gardens, or an entrance feature.
- Build note
- Short entrances need restraint. Use one focal point instead of crowding the entire path.
Daily Errand Loop
Plan how you move between home, shops, museum, villagers, airport, pier, and beaches during normal play.
- Best for
- Players who want the island to be beautiful without becoming annoying to use.
- Planner setup
- Mark a walking loop that touches the most-used buildings and at least two beach exits.
- Build note
- If a pretty area causes constant backtracking, move the path before decorating.
Villager Housing Plan
Villager homes need space for paths, yards, mail areas, flowers, trees, and small personality details.
- Best for
- Neighborhood builds, cottagecore lanes, city blocks, and scattered natural homes.
- Planner setup
- Test one grouped neighborhood and one split-neighborhood version before moving houses.
- Build note
- Leave negative space. Ten houses packed too tightly can make the island feel smaller.
Shop and Museum District
Nook Cranny, Able Sisters, and the museum can anchor a town center, market street, or formal garden.
- Best for
- Players who want a strong central destination and easy errands.
- Planner setup
- Reserve a forecourt for each public building before adding stalls or decor.
- Build note
- The museum needs more front space than it seems on the map because its facade is visually heavy.
Bridge and Incline Budget
Crossings should solve movement first and decorate second. Count them before you cut extra rivers or cliffs.
- Best for
- River loops, canal towns, mountain islands, and multi-level museum or campsite builds.
- Planner setup
- Mark every bridge and incline candidate, then remove any crossing that serves only one tiny corner.
- Build note
- A simple main route often matters more than a dramatic but inefficient cliff maze.
Theme Boundaries
Themes work better when each zone has a job. A forest, farm, resort, and city can coexist if transitions are planned.
- Best for
- Mixed-theme islands and players who change seasonal builds often.
- Planner setup
- Write one sentence for each zone: what it is, why it exists, and how it connects to the next zone.
- Build note
- Use paths, fencing, trees, and elevation changes as transitions instead of abrupt furniture walls.
Fallback Build Phase
A simplified backup plan keeps redesigns moving when the ambitious version becomes too expensive or cramped.
- Best for
- Large terraforming projects, full-island redesigns, and players returning after a long break.
- Planner setup
- Save a low-change version that keeps current rivers and cliffs but improves paths and building placement.
- Build note
- The fallback is not failure. It protects progress and helps you finish a playable island.
What to Decide in the Planner vs In-Game
The planner is best for expensive decisions: zones, building positions, routes, bridges, inclines, and major terraforming. The game is best for feel: walking pace, camera angles, furniture density, flower colors, and whether a path feels too narrow.
A useful Animal Crossing map maker workflow moves decisions to the cheapest place. If a choice costs Bells or several days in-game, test it first. If a choice depends on how it feels while walking, leave it flexible until you build the zone.
For big redesigns, keep three screenshots: current island, planned island, and fallback island. That small archive makes it easier to recover when you change your mind halfway through.
| Planning decision | Decide in the planner | Test in-game |
|---|---|---|
| Fixed landmarks | Airport, Resident Services, river mouths, pier, secret beach, rocks, and beach exits. | Whether the entrance view feels too short, too crowded, or too empty. |
| Zones | Neighborhood, shops, museum, campsite, farms, nature, beaches, and future open space. | Furniture density, lighting, seasonal items, and exact flower colors. |
| Movement | Main loop, shortcuts, bridge spots, incline spots, and beach access. | Whether walking between buildings feels smooth during errands. |
| Terraforming | Major cliffs, rivers, ponds, waterfalls, and elevation districts. | Small cliff cuts, pond shape, waterfall width, and path-edge polish. |
| Build order | Which zone gets built first, which buildings move first, and what can wait. | Final item placement and decorative variations after the route works. |
ACNH Island Planning Checklist
Run this checklist before moving buildings or starting major terraforming. It catches layout problems while they are still cheap to fix.
Map and Movement
- Airport and Resident Services are marked before decoration.
- Every main zone has a clear entrance and exit.
- The daily errand loop reaches shops, museum, villagers, and beaches.
- Bridge and incline spots solve real travel problems.
- At least one future redesign area remains flexible.
Build Readiness
- Villager homes have room for paths and yards.
- The museum and shops have enough front space.
- Terrain changes support zones instead of fighting them.
- The plan has a safe fallback version.
- The first build phase can be finished without moving every building at once.
Common Island Planning Mistakes
Most redesign problems come from skipping constraints, not from choosing the wrong aesthetic.
- Planning decoration before movement. Furniture can always change later. Bad routes and awkward bridge placement are much harder to fix.
- Flattening without a replacement map. A blank island removes useful constraints. Keep a phased plan before erasing cliffs and rivers.
- Ignoring the airport and Resident Services distance. A close plaza needs a compact entrance. A far plaza can support a longer scenic route.
- Copying another island exactly. Dream islands use different fixed landmarks, river mouths, and building priorities. Copy the planning logic, not the map.
- Moving all homes at once. Move buildings in batches so the island remains playable and you can revise the plan between phases.
Helpful References for Island Planning
Use these resources to confirm planning constraints and continue into more detailed guides.
- Open the ACNH Island Planner - Use the visual planner to test zones, buildings, routes, terrain, and screenshots before building.
- ACNH Island Planner Template - Copyable worksheet for fixed landmarks, zones, crossings, buildings, and build order.
- ACNH Island Layout Ideas - Practical layout patterns to use after the planning workflow is clear.
- Nookipedia: Designing - Reference for the Island Designer app and design-related mechanics in New Horizons.
- GameWith: Island Layout Guide - Reference for choosing and understanding island layout options.
ACNH Island Planning FAQ
What is the best way to start ACNH island planning?
Start by marking fixed landmarks, then choose zones, routes, buildings, bridges, inclines, terrain, and build phases in that order. This keeps the plan buildable.
Should I plan my island before unlocking terraforming?
Yes. Planning before terraforming helps you decide building placement and main routes early, so you spend fewer Bells and less time correcting mistakes later.
How many zones should an Animal Crossing island plan have?
Most islands work well with four to six zones: entrance, services, homes, shops or museum, nature or seasonal area, and beaches. Large islands can add farms, markets, or scenic districts.
Is it better to flatten my island or redesign around the current map?
Redesign around the current map unless you already have a replacement plan. Flattening can help advanced projects, but it often creates decision fatigue for players without a build order.
Can I use an Animal Crossing map maker for planning only?
Yes. A map maker or planner is most useful for testing expensive decisions before you apply them in-game. You can still adjust furniture, flowers, and tiny paths while building.
What should I build first after finishing the plan?
Build the main route first, then move the most important buildings, then add bridges and inclines, then terraform the surrounding zones, and decorate last.
Turn the Plan Into a Buildable Map
Open the free planner, trace your fixed landmarks, block your zones, and save a simple build order before changing your island in-game.
Open the Free ACNH Island Planner