ACNH Island Planner Template: Plan Your Island in 7 Steps
Use this practical ACNH island planner template before you move buildings, cut rivers, build cliffs, or flatten your map. It turns a vague island idea into a buildable checklist for fixed landmarks, zones, homes, shops, bridges, inclines, paths, and the order you should build everything in Animal Crossing: New Horizons.
Quick Answer: What Should an ACNH Island Planner Template Include?
A good ACNH island planner template should include seven decisions: fixed map features, major island zones, building placement, bridge and incline locations, river and cliff changes, daily movement routes, and a phased build order. If a template only gives you an empty grid, it is useful for drawing but not enough for planning.
The safest way to plan an ACNH island is to separate permanent constraints from flexible decoration. Resident Services, the airport, river mouths, the pier, the secret beach, and beach rocks should be marked first. Villager yards, shop streets, farms, forests, gardens, and photo spots can be moved around after you know where the fixed pieces sit.
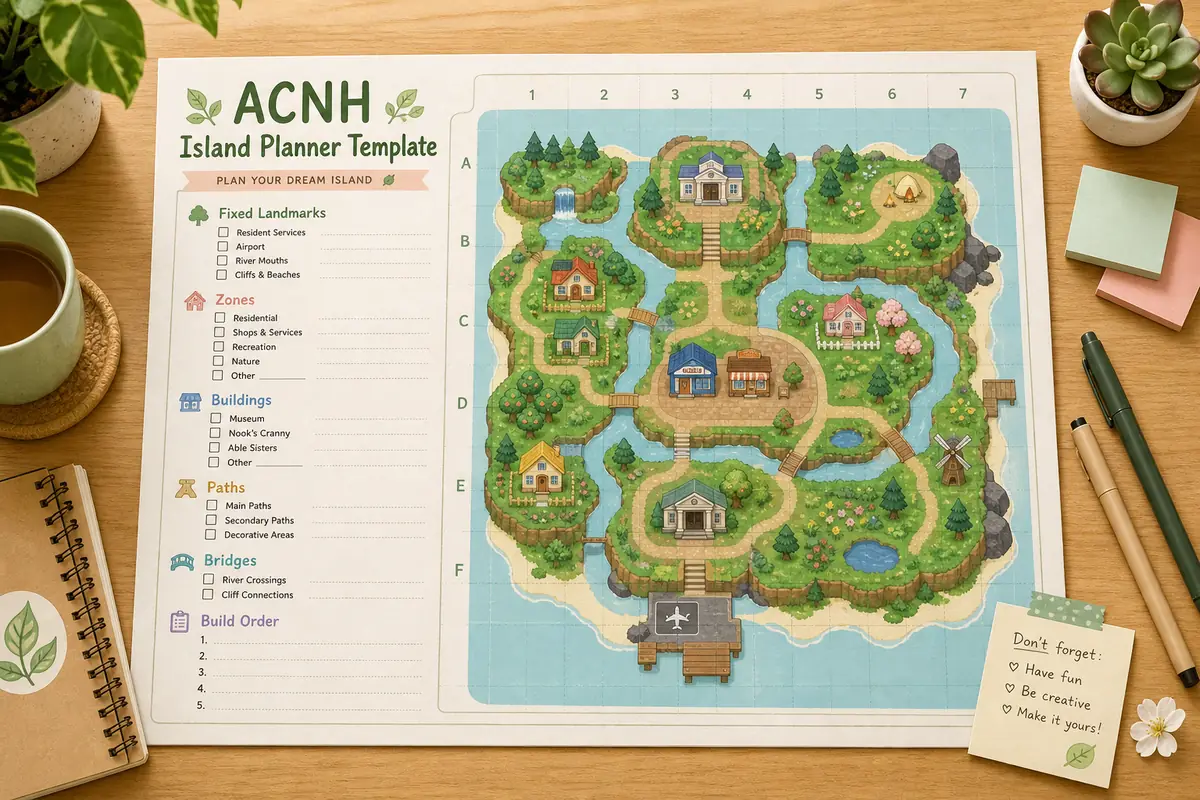
This page gives you a copyable planning worksheet, a step-by-step checklist, and a worked example. Use it with the free ACNH island planner when you want a visual map, then keep this template beside you as the decision checklist.
For GSC opportunity terms such as Animal Crossing map designer and ACNH map planner, the template also keeps the page useful: it tells you exactly what information to enter before the visual tool turns those decisions into a map.
- Fixed landmarks: airport, Resident Services, river mouths, pier, secret beach, rocks, beaches.
- Main zones: entrance, plaza, neighborhood, shops, museum, campsite, farm, forest, beach, seasonal area.
- Buildings: ten villager homes, player homes, Nook's Cranny, Able Sisters, museum, campsite.
- Movement: airport route, daily errand loop, bridge locations, incline locations, beach exits.
- Build order: what to move first, what to terraform second, and what decoration should wait.
Copy This ACNH Island Planning Template
Start with this worksheet before opening a map editor. It keeps your island plan practical because every row forces a real decision. You can copy it into a note app, spreadsheet, paper notebook, or use it as the outline while sketching in an ACNH island grid planner.
| Planning area | What to record | Decision rule |
|---|---|---|
| Fixed landmarks | Airport color and position, Resident Services distance, river mouths, pier, secret beach, rocks, beach exits. | Do not design around an idea that fights these features. Let them decide your entrance route and main island shape. |
| Island zones | Entrance, plaza, neighborhood, shops, museum, campsite, farm, orchard, forest, beach resort, seasonal build area. | Use five to eight zones for a full island. More than that can make the plan hard to finish. |
| Buildings | Ten villager homes, your house, secondary player homes, Nook's Cranny, Able Sisters, museum, campsite. | Place buildings before detailed decoration because they determine path width and open space. |
| Water and cliffs | Main rivers, ponds, waterfalls, cliff districts, overlook points, mountain or raised museum areas. | Every raised area needs an access plan. Every separated land pocket needs a reason to spend a bridge slot. |
| Paths and routes | Airport-to-plaza route, shop route, museum route, villager loop, beach loop, secret beach access. | Prioritize daily walking comfort before photo angles. A pretty island still needs to be easy to use. |
| Build order | First moves, first terraforming pass, bridge and incline installation, path cleanup, final decoration. | Move expensive or large elements only after the zones are stable. Save small items for the final pass. |
7-Step ACNH Island Planning Checklist
Follow these steps in order. They are written for players who want a buildable island plan, not just a pretty screenshot. If you already have a strong theme, keep it in mind, but still start with constraints and movement.
Mark fixed map features first
Open your in-game map and record every feature you cannot move: airport, Resident Services, river mouths, pier, secret beach, peninsula, rocks, and beach exits. These features decide whether your entrance should be straight, diagonal, garden-like, urban, hidden, or minimal. If the airport is close to Resident Services, plan a short entrance scene instead of forcing a long walkway.
Choose one main island promise
Write one sentence that describes the island you want to finish. Examples: a cozy forest island with scattered homes, a compact town with an efficient shopping street, a tropical resort with useful beaches, or a no-terraforming island that improves the natural map. This sentence prevents the plan from becoming a collection of unrelated ideas.
Block five to eight major zones
Use broad zones before placing individual items. A balanced beginner template often uses entrance, Resident Services area, villager neighborhood, shop and museum district, nature area, beach route, and one flexible seasonal area. If you decorate often, keep one zone deliberately open so future events and redesigns do not require flattening the whole island.
Place buildings before decoration
Villager homes, shops, the museum, campsite, and player houses shape the whole map. In a planner, place each building as a footprint before adding fences, flowers, furniture, or custom path details. This catches scale problems early: a neighborhood that looks charming in your head may feel cramped once ten houses need yards and paths.
Count bridges and inclines early
River-heavy and cliff-heavy islands can become difficult to build if crossings are planned too late. Mark every bridge and incline on the template before finalizing rivers or mountains. If an area needs two bridges and two inclines but only serves one small photo spot, simplify it or fold it into a larger route.
Draw the daily errand loop
Plan the route you will actually walk most often: airport, Resident Services, Nook's Cranny, Able Sisters, museum, villager homes, beaches, and storage access. Good ACNH island planning is not only about theme. It should reduce backtracking when you shop, talk to villagers, find fossils, check turnip prices, and host visitors.
Create a phased build order
Do not build every zone at once. A practical order is: fixed landmarks, building moves, main paths, bridges and inclines, first terraforming pass, secondary paths, zone decoration, final flowers and furniture. This keeps your island usable during construction and helps you stop before expensive changes become guesswork.
Example: Beginner Five-Zone Island Template
If you do not know where to start, use this simple Animal Crossing island template. It works for many maps because it gives structure without forcing a strict grid. You can later turn the same layout into cottagecore, urban, Japanese garden, farm, resort, or natural forest styling.
Entrance and plaza
Connect the airport to Resident Services with one clear route. Use a small garden, signpost, fountain, market stall, or framed path as the first scene.
Villager neighborhood
Place ten homes in a loose district with shared paths, small yards, and one community feature such as a park, cafe, or flower garden.
Shop and museum district
Keep Nook's Cranny, Able Sisters, and the museum easy to reach. Give the museum a wider front approach if you want it to feel like a landmark.
Nature or farm zone
Reserve a large flexible area for an orchard, crops, forest, campsite, picnic field, pond, or seasonal event build.
Beach and secret route
Plan beach entrances, pier access, rock areas, and a path to the secret beach before filling the coastline with furniture.
Planner Template: Decisions to Make Before Terraforming
Use this table when deciding whether your island plan is ready to build. If a row is blank, the plan may still be too vague for expensive in-game changes.
| Before building | Ready when | Common warning sign |
|---|---|---|
| Entrance route | You know the main path from airport to Resident Services and the first view visitors will see. | The entrance depends on moving Resident Services, which is not possible. |
| Neighborhood | All villager homes have enough room for pathing, yards, and walking gaps. | The houses fit on the map but leave no room for furniture or movement. |
| Shops and museum | Daily errands are easy and the museum has a visible approach if it is a focal point. | Buildings are scattered because empty space was available, not because the route makes sense. |
| Rivers and cliffs | Each crossing has a clear purpose and each raised area has an incline plan. | The map looks dramatic from above but becomes slow to walk through. |
| Decoration | You know which zones need dense decoration and which areas should stay open. | You are placing small items before buildings, paths, and crossings are settled. |
Common Mistakes This Template Helps You Avoid
Most ACNH island planning mistakes come from making decorative decisions before structural decisions. This template is designed to slow down the expensive choices and keep the flexible choices flexible.
- Flattening first and planning later. A blank island can feel freeing for one day, then overwhelming for weeks. Plan at least the five biggest zones before removing everything.
- Copying a dream island without checking fixed features. A layout built around another player's airport, river mouths, or Resident Services location may not transfer to your map.
- Making every area a separate destination. Too many isolated pockets can waste bridge and incline slots. Connect smaller scenes into loops where possible.
- Treating the template as a final decoration plan. The template should decide zones, buildings, crossings, and routes. Flower colors, item variants, and small clutter can wait.
- Ignoring the walking camera. A top-down grid can look balanced while the in-game walking view feels blocked by cliffs, trees, fences, or furniture.
Useful References While Filling the Template
Use planning inspiration flexibly, but verify game constraints before you spend Bells or start terraforming. These references help separate fixed rules from design preference.
- ACNH Map Designer Guide - Step-by-step internal guide for deciding fixed features, zones, building footprints, routes, bridges, inclines, rivers, and cliffs before using the visual planner.
- ACNH Island Designer & Map Planner Guide - Internal guide for terraforming workflow, bridge and incline planning, fixed map features, and common design mistakes.
- ACNH Island Layout Ideas - Internal guide with ten buildable island layout patterns you can combine with this template.
- Nookipedia: Bridge - Community reference for bridge behavior and constraints in Animal Crossing: New Horizons.
- Nookipedia: Incline - Community reference for incline behavior and planning constraints.
ACNH Island Planner Template FAQ
What is an ACNH island planner template?
An ACNH island planner template is a worksheet or checklist for organizing fixed map features, zones, buildings, paths, bridges, inclines, rivers, cliffs, and build order before making changes in Animal Crossing: New Horizons.
Is this the same as an ACNH island planner tool?
No. A planner tool gives you a visual map editor. This template gives you the planning decisions to make before and during that map work. They work best together: use the template for structure and the planner for visual layout.
How do I plan my ACNH island if I am a beginner?
Start with fixed landmarks, choose one simple island promise, block five major zones, place buildings, count bridges and inclines, draw the daily route, and build in phases. Avoid flattening the whole island until you have a replacement plan.
Can I use this Animal Crossing island template without terraforming?
Yes. The template works for no-terraforming redesigns too. Record your existing rivers and cliffs, then use paths, building moves, gardens, and small scenes to make the natural map easier to navigate.
Should I plan buildings or paths first?
Place fixed landmarks first, then major zones, then buildings, then paths. Paths depend on where buildings and crossings sit, so detailed path design is easier after the building footprints are stable.
How many island layouts should I test before building?
Test two or three versions: a safe plan, an ambitious plan, and a simplified fallback. Comparing a few planner screenshots usually shows which design has the best movement and least wasted space.
How do I use this template with an Animal Crossing map designer?
Fill the template first, then open the map designer and turn each decision into a visible layout: fixed landmarks, zones, buildings, paths, rivers, cliffs, bridges, inclines, and build order.
Turn the Template Into a Visual Island Plan
Copy the checklist, sketch the zones, then open the planner to test building placement, paths, bridges, inclines, rivers, and cliffs before changing your real island.
Open the Free ACNH Island Planner