Animal Crossing Island Layouts: 10 ACNH Map Ideas
Good ACNH island layouts are not just pretty map screenshots. They solve movement, building placement, theme, and terraforming problems before you spend Bells moving houses or reshaping rivers. Use these practical layout ideas and the goal-based layout picker before building in Animal Crossing: New Horizons.
Quick Answer: Which ACNH Island Layout Should You Choose?
The best ACNH island layout idea is the one that matches how you actually play. If you decorate often, choose a layout with open zones and flexible paths. If you want a finished town look, start with a neighborhood grid, shopping street, and central plaza. If you prefer a natural island, let rivers and cliffs guide the shape instead of forcing everything into straight lines.
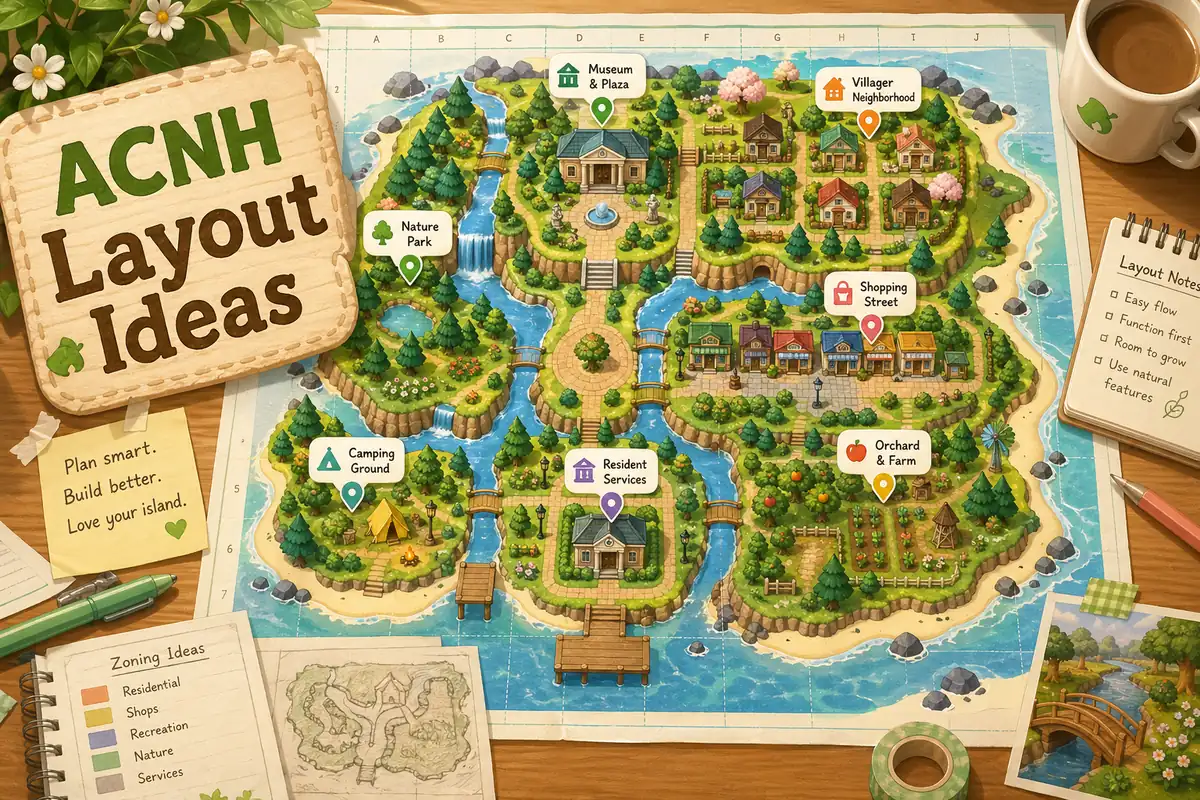
For most players, the safest first plan is a five-zone layout: entrance, Resident Services area, villager neighborhood, shop and museum district, and one large nature or seasonal zone. That structure gives you enough order to avoid chaos, while still leaving room for cottagecore forests, beach resorts, Japanese gardens, farms, or Slumber Island experiments.
- Put airport-to-Resident-Services movement first, because every visitor sees that route.
- Group shops, museum, and villager homes only if the map has enough walking space between them.
- Keep at least one large flexible zone for seasonal builds, photo spots, or future redesigns.
- Use a planner screenshot as your building reference before you move houses or cut new rivers.
How to Pick an Island Layout Before You Build
Search results for ACNH island layouts often show finished dream islands, but a finished island does not reveal the planning logic behind it. Before copying a layout, check whether it works with your airport position, Resident Services location, river mouths, pier, rocks, and beach exits. Those fixed features decide which ideas are realistic for your map.
A practical layout starts with function, then adds style. The function is simple: visitors should know where to walk, important buildings should be easy to find, and bridges or inclines should not be wasted on tiny dead ends. The style can come later through path types, fencing, flowers, custom designs, furniture, and lighting.
- Mark fixed landmarks first. Resident Services, airport, river mouths, pier, secret beach, and beach rocks should be drawn before anything decorative.
- Choose one primary movement route. Plan the path from the airport to Resident Services, then extend it to shops, museum, and neighborhoods.
- Block zones instead of decorating immediately. Use rough rectangles or organic blobs for homes, shops, nature, farms, beaches, and scenic viewpoints.
- Count crossings early. River-heavy and cliff-heavy layouts need bridge and incline planning before the design becomes too expensive to change.
- Test the layout at map scale and walking scale. A map can look balanced while still feeling cramped when your player walks between trees, fences, and buildings.
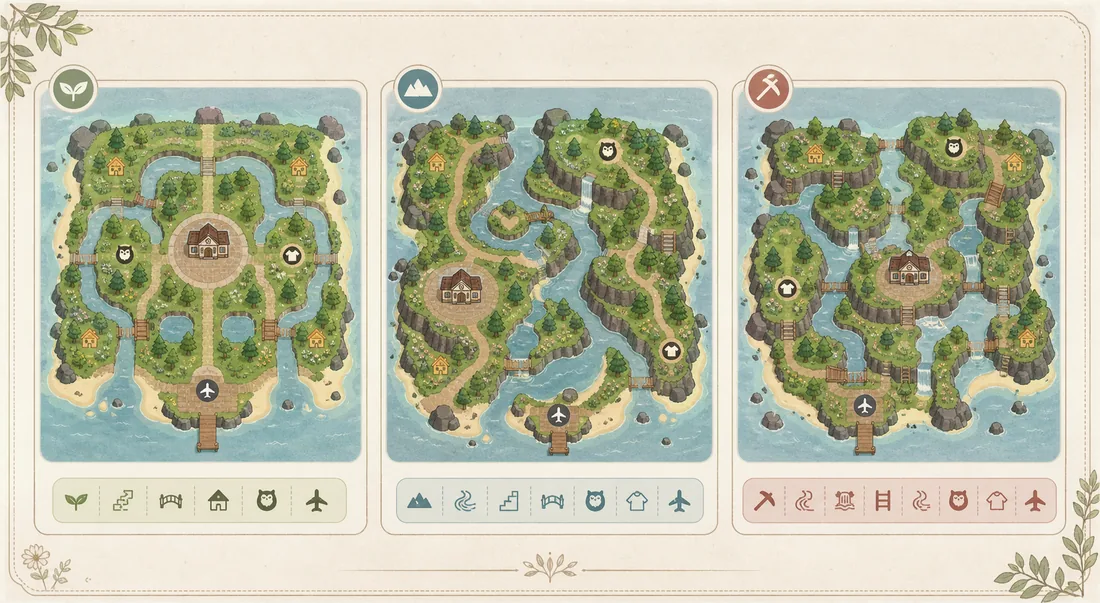
10 Practical ACNH Island Layout Ideas
These animal crossing island layout ideas are written as buildable planning patterns, not just themes. Each one includes a best-use case, a planner setup, and a build note so you can decide whether the idea fits your island before terraforming.
Five-Zone Starter Layout
Divide the island into entrance, services, homes, shops, and nature. This is the most balanced layout for players who want structure without locking themselves into one strict theme.
- Best for
- New or returning players who want a clear island plan before unlocking full terraforming.
- Planner setup
- Draw a main path from the airport to Resident Services, then place four surrounding zones like a loose town map.
- Build note
- Keep the nature zone large. It can later become a forest, farm, campsite, orchard, or seasonal event area.
Cottagecore Forest Layout
Use winding paths, uneven tree clusters, small bridges, and scattered homes to make the island feel grown-in instead of planned by a grid.
- Best for
- Players who like natural paths, flowers, cliffs, mushrooms, picnic spots, and cozy villager yards.
- Planner setup
- Sketch curved walking loops first, then place homes along the loops with small clearings around each house.
- Build note
- Avoid placing too many trees in narrow paths. Leave walking gaps so the layout stays comfortable during daily play.
Urban Town Center Layout
Build a compact town core with Resident Services, shops, museum, and a plaza-like path network. This layout makes the island easy to navigate and good for repeat errands.
- Best for
- Players who want a city, market, shopping street, or modern town feeling.
- Planner setup
- Place shops and museum near the plaza, then run straight or diagonal paths like streets between major buildings.
- Build note
- Use furniture and fencing to suggest roads, but keep enough open space so the town does not become visually crowded.
Entrance Showcase Layout
Treat the airport entrance as the first scene of the island. Use a short path, framed view, fountain, garden, archway, or small overlook before visitors reach Resident Services.
- Best for
- Dream address visitors, screenshots, island tours, and players whose airport is close to Resident Services.
- Planner setup
- Measure the airport-to-plaza distance, then design one controlled route with a focal point in the middle.
- Build note
- Short entrances should stay simple. A crowded entrance can block movement and make the island feel smaller than it is.
Villager Neighborhood Layout
Group villager homes into one district with shared gardens, mail areas, yards, and paths. It creates a strong community feel and makes daily interactions easier.
- Best for
- Players who like organized neighborhoods, themed yards, and efficient villager visits.
- Planner setup
- Plan house spacing first, then add paths, fences, trees, and one shared feature such as a park or market stall row.
- Build note
- Do not pack every house too tightly. A little negative space helps each yard feel intentional.
Museum Hill Layout
Place the museum on a raised or framed area so it becomes a destination instead of just another building. Add stairs, waterfalls, fossil displays, statues, or garden paths.
- Best for
- Players who want a dramatic landmark, education district, or formal garden.
- Planner setup
- Block a wide museum forecourt first, then decide where inclines and waterfalls will sit before decorating.
- Build note
- A museum hill can consume a lot of space. Keep paths wide enough for visitors to appreciate the front view.
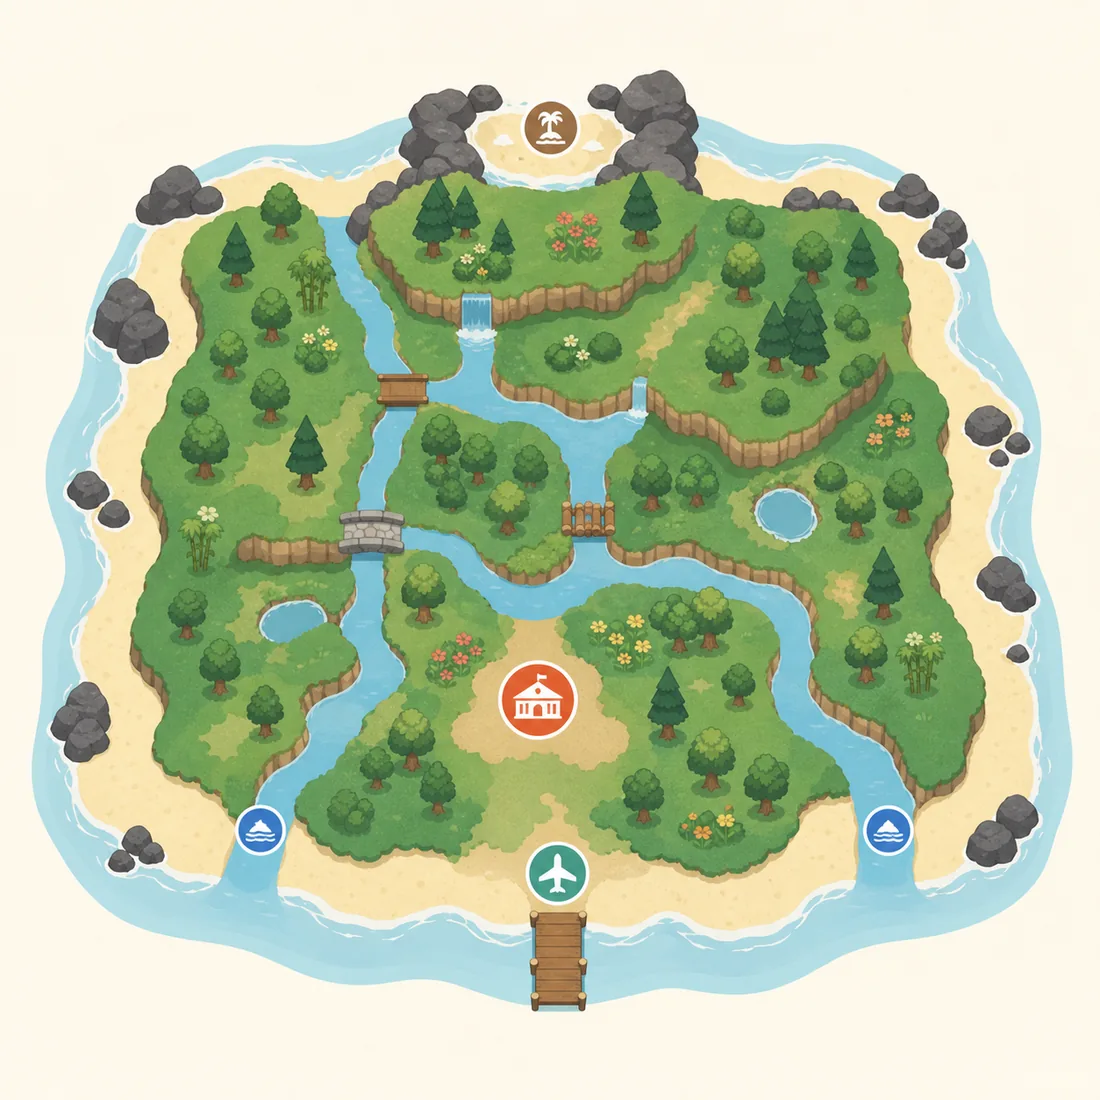
River Loop Layout
Let rivers define the island by creating loops around neighborhoods, parks, or a central town. The water guides movement and makes each district feel distinct.
- Best for
- Natural islands, canal towns, fishing areas, and players who enjoy bridge-focused scenery.
- Planner setup
- Sketch the main river shape first, mark bridge locations second, and only then place buildings near the banks.
- Build note
- Too many separated land pockets can waste bridge slots. Keep at least one route simple for daily movement.
Beach Resort Layout
Move the strongest design moments toward the coast: boardwalks, cafes, surf shops, tiki bars, beach markets, and ocean-view homes.
- Best for
- Summer islands, tropical themes, resort maps, and players who want beaches to feel useful.
- Planner setup
- Mark beach entrances, pier access, and rock areas, then connect them with a coastal loop path.
- Build note
- Beaches are narrow, so plan furniture clusters in small scenes rather than one continuous crowded strip.
Farm and Market Layout
Combine crop fields, orchards, stalls, storage sheds, and a small market street. It gives the island a practical daily-use area and a strong visual identity.
- Best for
- Players who like cooking, farming, orchard organization, and rustic town builds.
- Planner setup
- Create a rectangular or terraced farm zone, then add a path to shops so the farm feels connected to the economy of the island.
- Build note
- Use repeated field shapes for order, then soften the edges with flowers, trees, barrels, and fences.
Minimal No-Terraforming Layout
Work with the island you already have. Instead of flattening everything, organize existing rivers, cliffs, and buildings with paths and small themed scenes.
- Best for
- Players who feel overwhelmed by large redesigns or want a low-effort layout upgrade.
- Planner setup
- Trace your current map, mark problem areas, then add only the paths and building moves that solve those problems.
- Build note
- This is often the fastest layout to finish because it respects the natural map instead of fighting it.
From Layout Idea to Buildable Island Plan
A strong layout idea still needs a build order. The easiest workflow is to plan the big pieces in an ACNH island planner, compare screenshots, and then bring the chosen version into the game one zone at a time. If you try to decorate everything at once, you will often move the same buildings repeatedly.
Use the table below to decide what belongs in the planning stage and what should wait until you are building in-game. The goal is to make decisions at the cheapest possible moment.
For map-designer testing, save one screenshot for the safe version, one for the ambitious version, and one simplified fallback. This makes the final Animal Crossing map planner decision easier to compare. For a separate update-focused planning space, use the ACNH Slumber Island guide to test dream-island concepts without changing your main layout.
| Planning stage | Decide now | Leave flexible |
|---|---|---|
| Map structure | Main zones, airport route, Resident Services connection, river direction, cliff districts. | Small decorative scenes and final item placement. |
| Buildings | Villager neighborhood shape, shop district, museum position, campsite access. | Exact yard furniture, flower colors, and fence variations. |
| Movement | Primary path loops, bridge and incline locations, beach exits, secret beach route. | Secondary shortcuts and hidden photo spots. |
| Theme | One main mood such as natural, urban, resort, farm, or Japanese garden. | Seasonal colors and event-specific decoration. |
Choose the right ACNH island layout for your goal
The best layout is not always the prettiest screenshot. Match the idea to the problem you are solving: daily movement, neighborhood organization, theme clarity, or a low-terraforming rebuild.
Fast daily play
Choose this if you want fossils, shops, villagers, and the museum to be easy to reach.
- Keep the airport, Resident Services, shops, and museum on one readable loop.
- Use bridges and inclines for repeated errands, not isolated photo corners.
- Put decorative detours after the main route is comfortable.
Strong visual theme
Choose this if you want a cottagecore, city, resort, farm, forest, or Japanese garden island to feel coherent.
- Use one entrance scene to set expectations.
- Repeat path shape, fencing, trees, and water rhythm across zones.
- Keep one neutral buffer between intense themed areas.
Minimal terraforming
Choose this if you like your current map but need it to feel organized.
- Keep river mouths, cliffs, and beaches mostly intact.
- Move buildings to clarify routes before cutting new rivers.
- Use gardens, yards, and signage to define zones without flattening.
How to Match Layout Ideas to Your Starting Map
Similarweb keyword research for this page showed related demand around ACNH map layouts, ideal layout for ACNH island, and Animal Crossing island ideas. Those searches usually need help choosing which idea fits the map they already have, not another gallery of finished screenshots.
Use the planner to test each layout idea against your fixed airport, Resident Services, river mouths, pier, beach rocks, and secret beach. If an idea needs more bridges, inclines, or building moves than your plan can support, keep the theme but simplify the map structure.
Best fit for close Resident Services
Choose compact entrance, town-center, or garden-court layouts. A long forced path often feels crowded when the airport and plaza are close.
- Use a framed view, diagonal path, or small market rather than a maze.
- Keep the plaza readable from the airport route.
Best fit for wide open maps
Use neighborhood, farm, resort, or museum-campus layouts. Wide maps can handle larger zones if the main walking loop stays obvious.
- Plan one main loop before placing decorative side areas.
- Reserve a flexible seasonal zone so the island can change later.
Best fit for river-heavy maps
Use canal, nature trail, or split-district layouts only after counting bridge needs. Too many small islands can make errands slow.
- Place crossings where they shorten daily routes.
- Avoid water features that create dead ends.
Best fit for low-terraforming builds
Keep the natural river and cliff structure, then use paths, yards, gardens, and furniture clusters to make the layout intentional.
- Trace the existing map first instead of flattening.
- Use building moves and path hierarchy as the main design tools.
ACNH Layout Planning Checklist
Before you commit to a layout, run through this checklist. It catches the common problems that make an island look good on paper but feel awkward in daily play.
Movement and Access
- The airport route to Resident Services is obvious.
- Shops, museum, and villager homes are reachable without constant backtracking.
- Each main area has an entrance and an exit.
- Beach rocks, pier, and secret beach are not forgotten.
- Bridge and incline locations support the layout instead of decorating random corners.
Buildings and Scale
- Villager homes have enough room for paths and yards.
- The museum has a visible front approach.
- Shop areas have space for stalls or street decoration.
- Resident Services is treated as a fixed anchor, not an obstacle.
- Large themed zones leave room for future redesigns.
Common Layout Mistakes to Avoid
Most failed island redesigns do not fail because the theme is bad. They fail because the layout ignores movement, scale, or fixed map features.
- Copying a dream island without checking your map. A layout built around a different airport, river mouth, or Resident Services location may not transfer cleanly to your island.
- Starting with decoration before zones. Furniture and flowers are easier to place once homes, shops, museum, paths, and water features are settled.
- Using too many narrow paths. Narrow routes can look charming in screenshots but become frustrating when trees, fences, and furniture block movement.
- Flattening without a replacement plan. A blank island gives you freedom, but it also removes helpful constraints. Plan at least the major zones before flattening.
- Forgetting daily play. Your layout should still work for shops, villagers, fossils, visitors, events, and quick errands, not only for a single photo angle.
Useful References While Planning
These references help you verify game constraints while using layout ideas. Treat inspiration as flexible, but treat building limits and unlock conditions as constraints.
- ACNH Map Designer Guide - Step-by-step internal guide for deciding fixed features, zones, building footprints, routes, bridges, inclines, rivers, and cliffs before using the visual planner.
- ACNH Island Designer & Map Planner Guide - Internal guide for terraforming workflow, fixed map features, bridge and incline planning, and common design mistakes.
- ACNH Island Planner Template - Copyable worksheet for turning a layout idea into zones, building positions, movement routes, crossings, and build order.
- Nookipedia: Bridge - Community reference for bridge behavior and constraints in Animal Crossing: New Horizons.
- Nookipedia: Incline - Community reference for incline behavior and planning constraints.
- ACNH Map Layouts Guide - Use this companion guide when the layout decision depends on airport position, Resident Services, river mouths, pier, beaches, or rock placement.
ACNH Island Layout Ideas FAQ
What is the easiest ACNH island layout idea for beginners?
The easiest beginner layout is a five-zone plan: entrance, Resident Services, villager neighborhood, shop and museum district, and one large nature or seasonal zone. It is simple enough to build but flexible enough to change later.
Should I flatten my island before using these ACNH island layout ideas?
Only flatten after you have a replacement plan. Many players lose momentum after clearing everything because the island becomes too open. A planner screenshot gives you a structure before you remove cliffs, rivers, or trees.
How do I plan an ACNH entrance layout if my airport is close to Resident Services?
Use a short controlled scene instead of forcing a long path. A small garden, fountain, archway, diagonal path, or framed view can make a close entrance feel intentional without blocking movement.
What is a good ACNH neighborhood layout?
A good neighborhood layout gives each villager home a clear path, a little yard space, and access to a shared feature such as a park, plaza, market, or garden. Avoid packing all houses so tightly that the district feels like storage.
Can I use these animal crossing island layout ideas without terraforming?
Yes. The minimal no-terraforming layout is designed for that. Trace your current island, keep the strongest natural features, and use paths, building moves, gardens, and small themed scenes to organize the map.
How many ACNH island layouts should I test before building?
Test two or three versions: a safe version, a more ambitious version, and a simplified fallback. Comparing a few planner screenshots usually reveals which layout has the best movement and least wasted space.
Should I test these layout ideas in an Animal Crossing map designer first?
Yes. Test the layout in a map designer before moving buildings or terraforming. It helps you catch route, bridge, incline, and spacing problems while they are still easy to change.
What is the ideal layout for an ACNH island?
The ideal layout has a clear airport-to-plaza route, useful building clusters, enough open space around services, and crossings that support daily movement. The exact style can be natural, city, resort, farm, or no-terraforming.
Do all starting island layouts have an equal chance in ACNH?
The game offers a random set of starting maps, and each can become a good island. What matters most for planning is the airport, Resident Services, river mouths, pier, and beach rocks because those features shape your routes.
How do I choose the best ACNH map layout for my island?
Start with fixed features: airport, Resident Services, river mouths, pier, beach rocks, and secret beach. Then choose a layout idea that improves movement without requiring too many bridges, inclines, or building moves.
How do I choose an Animal Crossing island layout for my river shape?
Start with the airport-to-Resident-Services route, then use the river mouths, peninsula, and fixed rocks to choose a symmetrical, natural, or neighborhood layout. Keep cute shapes such as heart ponds or curved districts limited to one feature so building access, bridges, and beach exits still work.
Plan Your Layout Before Moving Buildings
Choose one layout idea, sketch the zones, count crossings, and save a reference before you start terraforming in-game.
Open the Free ACNH Island Planner